Big Update: Cottage Pie and the great Pizzadilla and Mozzarella Stick Experiment!
I don't liked mixed food.
By that I mean, without qualms, most "white" food. Casseroles, potato salads, coleslaw, meatloaf. I won't eat any of it (well, occasional casseroles get a pass for me). This is simply because I didn't grow up eating it. To me, why mix all those ingredients in a dish and melt it together when you could prepare those ingredients separately and come up with a much more pleasant experience?
Of course my marriage to Megan has changed that experience some. By force, mind you, but I have become slightly more open to the idea of these mixi-cated dishes as meals. Plus my adventures in cooking have made me a little more apt to try things I normally would not have. So when AJ suggested we make a cottage pie, my initial reaction was "Ew!" followed by "Hm..." followed by "Why the heck not!"
I'm glad we did it.

All day I had "God, That's Good!" from Sweeney Todd stuck in my head.
Ingredients
Cubed stew beef
Packet beef stock
5 lbs of potatoes? I think it was 5.
Carrots
1 bag frozen peas
2 yellow onions
Soy Milk
Salt/Pepper
Worcestershire Sauce
Herbes de Provence
2 heads of garlic
I'm doing this from memory, and since it was on Friday and it is now Wednesday I may make a mistake. AJ feel free to jump in and correct me and I'll edit the post as needed.
We didn't use a real recipe, but we did have this one on hand as sort of a reference.
Ok, this dish was a lot of work, so it's not a quick and easy weeknight thing by any means.
The best part about this, I think, is its infinite customization. You could add whatever vegetables into the center or remove whatever you don't like. Of course you probably wouldn't want to toss say, a bell pepper in there, but you never know.
First step: Start boiling your potatoes. AJ did not peel them, it's up to you. He also chucked in the potatoes before the water came to a boil, so that's kind of a cool idea. I once again used the Pasta pot with the built in strainer. Also preheat your oven to 350.
Then it's chopping/mincing/julienne time. Mince the garlic, place into a small dish or into a pile somewhere. We julienned the carrots, but you can cut your carrots however you want. Then chop your onions, also place into a pile. AJ also sliced down the size of the beef pieces; the cubes for the stew were just slightly too large to be eaten comfortably within a pie setting.
Brown the beef a bit, then add beef stock and simmer. We overcooked our beef a little bit, but with so many things moving in the kitchen at the same time it was hard to keep track. Add W. Sauce to taste, then add peas and carrots evenly throughout.
For the potatoes, AJ used my...hand mixer? Super slicer? I can't remember what it's called at the moment, actually. In any case, it's a hand thing with a spinning blade. I'll look at the box when I get home to give you a proper name. He used it to blast the potatoes into their final creamy form, forgoing the need for the hand-masher. Then add the onion, garlic, milk (we used soy milk for Rachelle's sake) and then salt and pepper to taste.
OBJECTION!
AJ posted a better potato instruction in the comments. Apparently I really wasn't paying attention while he was doing it. So, I have placed it in the main entry for clarification.
Meanwhile in beef land, strain out the meat and vegetables from the rest of the juice, place into a casserole dish or whatever preferred baking dish you like. Then take the strained juice and place over low heat and thicken it. Ideally one should use corn starch, but I didn't have any and we used about three tablespoons of flour, pre-mixed with water to prevent clumping. It...didn't quite work. At this point you can also season the liquid to taste: I added additional pepper and just a bit of Herbes de Provence. I'm not sure the HdP did anything, but hey, I knew it was there.
In any case: pour thickened liquid over vegetables then layer with potatoes on top. Bake in oven at about 350 for 30 minutes. Remove, cool, eat.
As I said before, our beef was a little chewy; slightly overdone because our attention was divided among a few other things we were working on. But it was still quite good. As you can see, however, our liquid pierced through the top of our potato layer, preventing our potatoes from every really browning and crisping over like in our example recipe. Between the lack of thickening that my failure to provide corn starch created and I think sheer amount of liquid, AJ thinks that it boiled while in the oven and bubbled through the surface. I think a combination of proper thickening and using just a little bit less of the liquid would prevent that.
Still, over all, it was quite a good meal. Filling and satisfying. And it was a fun learning experience for me as AJ was head chef on this venture, showing me his processes and steps. As you can see it involves rather little measuring and quite a bit of guesswork and eyeing out, but I sort of have a fondness for that kind of cooking.
I hope to have AJ and Rachelle over again for more adventures in cooking. Next time I'll take the lead though and show AJ something...like...I dunno, the Ing Steak-Thumb method? That's a secret move that's pretty cool.
=====
Ah, the great experiment! No, I'm not talking about our system of government, I'm talking about the most delicious mis-hearing of a word ever: Pizzadilla.
As stated previously, the concept came from a conversation my brother Matt and I had on the phone, by which I told him I was making Quesadillas (with said quesadilla in mouth) and he thought I said Pizzadilla. The great experiment began!
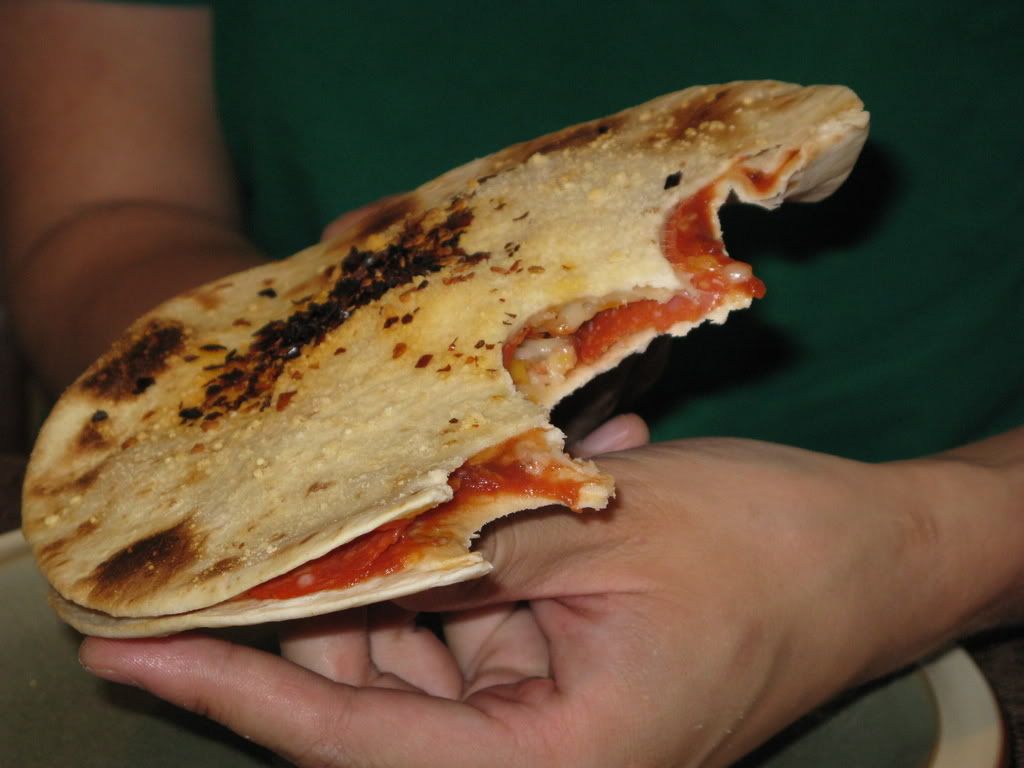
The pizzadilla, as modeled by Matt.
Ingredients
Flour tortillas (We used taco-sized Mission tortillas)
Pizza sauce (We used Boboli pizza sauce packets)
Cheese (We used mixed Pizza cheese)
Pepperoni (We used turkey pepperoni: it crisps up really crunchy)
Italian Sausage (I browned some up)
Parmesan (optional)
Crushed Red Peppers (optional)
Olive Oil
Ok, pretty simple idea and really, you probably don't even need to read the ingredients or the procedure: but we did try it with two different oven settings and two different ingredient combinations. So let's see the results!
Pizzadilla 1
Ingredient Order: Tortilla, Sauce, Cheese, Pepperoni and Sausage, a bit of Cheese, Tortilla, Brushed Olive Oil, Parmesan, Red Pepper.
Oven Setting: Broil
This takes about two minutes. Broil is very hot and applies heat from above, which gives it that crunchy, crispy aspect (the pictured Pizzadilla is Pizzadilla 1). This was a smashing success, though as you can see the crushed pepper got scorched and effectively destroyed its flavor. I think we both ended up brushing ours off, actually. In any case, I really liked the crispiness of it because it felt more pizza-like. Quite delicious!
Pizzadilla 2
Ingredient Order: Tortilla, Cheese, Sauce, Crushed Red Pepper, Pepperoni and Sausage, Cheese, Tortilla, Brushed Olive Oil, Parmesan.
Oven Setting: 450
Ok, I prefer this ingredient order. With cheese on both sides of the tortilla it holds together better (Pizzadilla 1 was a bit slide-y) and putting the red pepper inside the sauce prevented it from being scorched, giving it that extra kick. I do not, however, like that oven setting. It took much longer to bake this way, about 5-10 minutes. This slower cooking made the Pizzadilla much softer and in someways, much more Quesadilla-like. I prefer the crunchy kind myself, but if you like it soft, 450 is the way to go.
I think the ultimate Pizzadilla would probably be Ingredient Order 2 on Broil.
Unofficial Pizzadilla 3
Using the leftover ingredients, I made one on Monday, but this time used the Toaster Oven on Broil. It is equally effective to broil in a toaster oven, but it takes longer. Still, it does save you from having to pre-heat and subsequently heat up your apartment, something you don't want this close to summer here in Los Angeles.
Experiment result: A smashing success! A great lunch-time food or maybe even for a party? I think maybe using the larger burrito tortillas could lend to making an appetizer as well, if you slice it up with a pizza cutter and throw on a plate.
=====
I love mozzarella sticks. So when I saw this recipe, I had to try it. We had these on Pizzadilla day.

Don't be fooled: Italian Goodness waits inside!
Here is the recipe.
Ok, this is pretty simple.
String Cheese
Egg Roll Wrappers
Oil.
Ta-da!
I do want to mention one thing about Egg Roll Wrappers, however. We spent forever trying to find them: looked in Vons, looked in Gelson's, and ultimately went to a Korean market where my brother and I were assaulted with the smell of Kim Chi and fish and were given sidelong looks as to say "What're those guys doing here?" to find them. But the sad truth is you can find them in a regular grocery store! The key thing that I did not know is that Won Ton and Eggroll wrappers are refrigerated. You'd think I'd know that, but I didn't. So if you want to try this, remember that tip.
Ok, heat your oil to 350, wrap the cheese, fry it, dry it, and eat. REALLY REALLY REALLY GOOD. Like, it shouldn't be that good type of good, but it is. The cheese melts perfectly, the eggroll wrapper is easier to eat than the normal breading found on Cheese Sticks and it's simple and good. Another good appetizer method for not a lot of work!
=====
Not sure when I'll be posting again: Took Monday off as I was cooked-out from Friday and Saturday. I may make something simple tonight and if it's a recipe I haven't posted I will, but no big projects for this week.
Family Secrets!: Next week, however, my grandparents are coming into town for my brother's college graduation. On Monday my dad and grandpa will be teaching me their secret Korean BBQ Wing/Beef Recipe, a recipe that has to be conducted entirely by taste. I will definitely be writing a post about that once it's concluded: though don't expect me to tell you what's inside :P .
By that I mean, without qualms, most "white" food. Casseroles, potato salads, coleslaw, meatloaf. I won't eat any of it (well, occasional casseroles get a pass for me). This is simply because I didn't grow up eating it. To me, why mix all those ingredients in a dish and melt it together when you could prepare those ingredients separately and come up with a much more pleasant experience?
Of course my marriage to Megan has changed that experience some. By force, mind you, but I have become slightly more open to the idea of these mixi-cated dishes as meals. Plus my adventures in cooking have made me a little more apt to try things I normally would not have. So when AJ suggested we make a cottage pie, my initial reaction was "Ew!" followed by "Hm..." followed by "Why the heck not!"
I'm glad we did it.
All day I had "God, That's Good!" from Sweeney Todd stuck in my head.
Ingredients
Cubed stew beef
Packet beef stock
5 lbs of potatoes? I think it was 5.
Carrots
1 bag frozen peas
2 yellow onions
Soy Milk
Salt/Pepper
Worcestershire Sauce
Herbes de Provence
2 heads of garlic
I'm doing this from memory, and since it was on Friday and it is now Wednesday I may make a mistake. AJ feel free to jump in and correct me and I'll edit the post as needed.
We didn't use a real recipe, but we did have this one on hand as sort of a reference.
Ok, this dish was a lot of work, so it's not a quick and easy weeknight thing by any means.
The best part about this, I think, is its infinite customization. You could add whatever vegetables into the center or remove whatever you don't like. Of course you probably wouldn't want to toss say, a bell pepper in there, but you never know.
First step: Start boiling your potatoes. AJ did not peel them, it's up to you. He also chucked in the potatoes before the water came to a boil, so that's kind of a cool idea. I once again used the Pasta pot with the built in strainer. Also preheat your oven to 350.
Then it's chopping/mincing/julienne time. Mince the garlic, place into a small dish or into a pile somewhere. We julienned the carrots, but you can cut your carrots however you want. Then chop your onions, also place into a pile. AJ also sliced down the size of the beef pieces; the cubes for the stew were just slightly too large to be eaten comfortably within a pie setting.
Brown the beef a bit, then add beef stock and simmer. We overcooked our beef a little bit, but with so many things moving in the kitchen at the same time it was hard to keep track. Add W. Sauce to taste, then add peas and carrots evenly throughout.
For the potatoes, AJ used my...hand mixer? Super slicer? I can't remember what it's called at the moment, actually. In any case, it's a hand thing with a spinning blade. I'll look at the box when I get home to give you a proper name. He used it to blast the potatoes into their final creamy form, forgoing the need for the hand-masher. Then add the onion, garlic, milk (we used soy milk for Rachelle's sake) and then salt and pepper to taste.
OBJECTION!
AJ posted a better potato instruction in the comments. Apparently I really wasn't paying attention while he was doing it. So, I have placed it in the main entry for clarification.
Corrected Potato Procedure
Put water on heat to boil. Chop up
potatoes into about .75 inch chunks. Throw chunks into water. If you
wait for the water to boil you will just be wasting time and
electricity/gas. The small chunk size will cook them evenly. When you
can stick a fork through them with moderate ease take them of and drain
them.
Put the pot back on the stove and pour in a good amount of
olive oil. This will be the only fat used, so don't be too frugal with
it. Once heated, throw in a respectable amount of chopped onions and
garlic. These should be measured in heads and bulbs, not cloves and...
um... whatever a small unit of onion is. Saute!
Then add milk.
Go ahead, add too much! We don't want dry potatoes. Then dump on
potatoes and blend, with an IMMERSION BLENDER, until creamy. Too dry?
Well, you didn't add too much milk. Too wet? Thats fine. Just let it
sit on heat until the desired consistency is reached. The excess now
evaporated milk will just help with the creaminess. Salt and pepper to
taste.
Eat out of pot while making the rest of your food.
Serve with entree.
Go back for seconds... and thirds.
Place extra in container in fridge for another time.
Eat any stuck to the spoon and pot while cleaning.
Go back to fridge in an hour and eat leftovers.
Repeat same cleaning method with leftover container.
Repeat.
Meanwhile in beef land, strain out the meat and vegetables from the rest of the juice, place into a casserole dish or whatever preferred baking dish you like. Then take the strained juice and place over low heat and thicken it. Ideally one should use corn starch, but I didn't have any and we used about three tablespoons of flour, pre-mixed with water to prevent clumping. It...didn't quite work. At this point you can also season the liquid to taste: I added additional pepper and just a bit of Herbes de Provence. I'm not sure the HdP did anything, but hey, I knew it was there.
In any case: pour thickened liquid over vegetables then layer with potatoes on top. Bake in oven at about 350 for 30 minutes. Remove, cool, eat.
As I said before, our beef was a little chewy; slightly overdone because our attention was divided among a few other things we were working on. But it was still quite good. As you can see, however, our liquid pierced through the top of our potato layer, preventing our potatoes from every really browning and crisping over like in our example recipe. Between the lack of thickening that my failure to provide corn starch created and I think sheer amount of liquid, AJ thinks that it boiled while in the oven and bubbled through the surface. I think a combination of proper thickening and using just a little bit less of the liquid would prevent that.
Still, over all, it was quite a good meal. Filling and satisfying. And it was a fun learning experience for me as AJ was head chef on this venture, showing me his processes and steps. As you can see it involves rather little measuring and quite a bit of guesswork and eyeing out, but I sort of have a fondness for that kind of cooking.
I hope to have AJ and Rachelle over again for more adventures in cooking. Next time I'll take the lead though and show AJ something...like...I dunno, the Ing Steak-Thumb method? That's a secret move that's pretty cool.
=====
Ah, the great experiment! No, I'm not talking about our system of government, I'm talking about the most delicious mis-hearing of a word ever: Pizzadilla.
As stated previously, the concept came from a conversation my brother Matt and I had on the phone, by which I told him I was making Quesadillas (with said quesadilla in mouth) and he thought I said Pizzadilla. The great experiment began!
The pizzadilla, as modeled by Matt.
Ingredients
Flour tortillas (We used taco-sized Mission tortillas)
Pizza sauce (We used Boboli pizza sauce packets)
Cheese (We used mixed Pizza cheese)
Pepperoni (We used turkey pepperoni: it crisps up really crunchy)
Italian Sausage (I browned some up)
Parmesan (optional)
Crushed Red Peppers (optional)
Olive Oil
Ok, pretty simple idea and really, you probably don't even need to read the ingredients or the procedure: but we did try it with two different oven settings and two different ingredient combinations. So let's see the results!
Pizzadilla 1
Ingredient Order: Tortilla, Sauce, Cheese, Pepperoni and Sausage, a bit of Cheese, Tortilla, Brushed Olive Oil, Parmesan, Red Pepper.
Oven Setting: Broil
This takes about two minutes. Broil is very hot and applies heat from above, which gives it that crunchy, crispy aspect (the pictured Pizzadilla is Pizzadilla 1). This was a smashing success, though as you can see the crushed pepper got scorched and effectively destroyed its flavor. I think we both ended up brushing ours off, actually. In any case, I really liked the crispiness of it because it felt more pizza-like. Quite delicious!
Pizzadilla 2
Ingredient Order: Tortilla, Cheese, Sauce, Crushed Red Pepper, Pepperoni and Sausage, Cheese, Tortilla, Brushed Olive Oil, Parmesan.
Oven Setting: 450
Ok, I prefer this ingredient order. With cheese on both sides of the tortilla it holds together better (Pizzadilla 1 was a bit slide-y) and putting the red pepper inside the sauce prevented it from being scorched, giving it that extra kick. I do not, however, like that oven setting. It took much longer to bake this way, about 5-10 minutes. This slower cooking made the Pizzadilla much softer and in someways, much more Quesadilla-like. I prefer the crunchy kind myself, but if you like it soft, 450 is the way to go.
I think the ultimate Pizzadilla would probably be Ingredient Order 2 on Broil.
Unofficial Pizzadilla 3
Using the leftover ingredients, I made one on Monday, but this time used the Toaster Oven on Broil. It is equally effective to broil in a toaster oven, but it takes longer. Still, it does save you from having to pre-heat and subsequently heat up your apartment, something you don't want this close to summer here in Los Angeles.
Experiment result: A smashing success! A great lunch-time food or maybe even for a party? I think maybe using the larger burrito tortillas could lend to making an appetizer as well, if you slice it up with a pizza cutter and throw on a plate.
=====
I love mozzarella sticks. So when I saw this recipe, I had to try it. We had these on Pizzadilla day.
Don't be fooled: Italian Goodness waits inside!
Here is the recipe.
Ok, this is pretty simple.
String Cheese
Egg Roll Wrappers
Oil.
Ta-da!
I do want to mention one thing about Egg Roll Wrappers, however. We spent forever trying to find them: looked in Vons, looked in Gelson's, and ultimately went to a Korean market where my brother and I were assaulted with the smell of Kim Chi and fish and were given sidelong looks as to say "What're those guys doing here?" to find them. But the sad truth is you can find them in a regular grocery store! The key thing that I did not know is that Won Ton and Eggroll wrappers are refrigerated. You'd think I'd know that, but I didn't. So if you want to try this, remember that tip.
Ok, heat your oil to 350, wrap the cheese, fry it, dry it, and eat. REALLY REALLY REALLY GOOD. Like, it shouldn't be that good type of good, but it is. The cheese melts perfectly, the eggroll wrapper is easier to eat than the normal breading found on Cheese Sticks and it's simple and good. Another good appetizer method for not a lot of work!
=====
Not sure when I'll be posting again: Took Monday off as I was cooked-out from Friday and Saturday. I may make something simple tonight and if it's a recipe I haven't posted I will, but no big projects for this week.
Family Secrets!: Next week, however, my grandparents are coming into town for my brother's college graduation. On Monday my dad and grandpa will be teaching me their secret Korean BBQ Wing/Beef Recipe, a recipe that has to be conducted entirely by taste. I will definitely be writing a post about that once it's concluded: though don't expect me to tell you what's inside :P .
Subscribe to:
Post Comments (Atom)

6 comments:
Dang, could mozzarella egg rolls happen again when we're in town? We made cold soba noodles with dipping sauce for dinner tonight. It was a filling cold dinner that seems like it would be perfect for a hot Los Angeles summer night. Jeni's been on a big Asian food kick recently. Got any specialties?
I second the egg rolls. Yum!
Also, the reason your flour did not work to thicken your sauce is because, well, that's not how you use flour to thicken sauce. As you probably now know, simply adding flour to liquid makes it lumpy, sticky, and gross, with a taste like raw flour. In order to make it work, you need to make a "roux", or a cooked flour base. Here's how:
1. for each tablespoon of flour you will need, melt one tablespoon of butter in a small saucepan over medium-low heat.
2. Once it's bubbly, add in the flour. using a whisk (I use a gravy whisk), stir the flour into the butter, breaking up any clumps.
3. Keep stirring, frequently, for awhile. The color will change from pale yellow to golden to tan to light brown to chocolate brown. Though tempting to take it off before, wait until it's reached that milk-chocolate color before removing from heat. (um, don't wait until it's black. Just so you know.)
4. Stir this roux into your sauce, whisking vigorously. After a few minutes of stirring, your sauce should be starting to thicken up!
Hope that helps for future cooking endeavours!
p.s. Love the pictures! I always forget to take them until *after* we've eaten.
Corrected Potato Procedure
Put water on heat to boil. Chop up potatoes into about .75 inch chunks. Throw chunks into water. If you wait for the water to boil you will just be wasting time and electricity/gas. The small chunk size will cook them evenly. When you can stick a fork through them with moderate ease take them of and drain them.
Put the pot back on the stove and pour in a good amount of olive oil. This will be the only fat used, so don't be too frugal with it. Once heated, throw in a respectable amount of chopped onions and garlic. These should be measured in heads and bulbs, not cloves and... um... whatever a small unit of onion is. Saute!
Then add milk. Go ahead, add too much! We don't want dry potatoes. Then dump on potatoes and blend, with an IMMERSION BLENDER, until creamy. Too dry? Well, you didn't add too much milk. Too wet? Thats fine. Just let it sit on heat until the desired consistency is reached. The excess now evaporated milk will just help with the creaminess. Salt and pepper to taste.
Eat out of pot while making the rest of your food.
Serve with entree.
Go back for seconds... and thirds.
Place extra in container in fridge for another time.
Eat any stuck to the spoon and pot while cleaning.
Go back to fridge in an hour and eat leftovers.
Repeat same cleaning method with leftover container.
Repeat.
Matt: We will definitely do Eggzarella Rollsticks when you guys are in. They're really stupid easy to do, though I do need one of those baskety things to pull things out of The oil. At the moment I'm using a slotted spoon.
As far as Asian recipes I'm dreadfully ignorant. But my dad is retiring at the end of this month so I'll be picking his brain for all of his usuals: wontons, fried wontons, pot stickers, shredded pork (that's a Hawaiian dish...I think it's called Kalua pork?) as well as his methods for appropriately tenderizing meats when making stir fry. I'll write it all up once I've learned the techniques, or heck, we can work them out when you're here.
Jeni: Aha! Thanks for that; and to think I've actually heard of roux. Shame on me. Still, I should buy some dang cornstartch.
AJ: Added your correction to the main post.
dude....i am way into that pizzadilla.
Post a Comment